
How To Build The Perfect Golf Swing
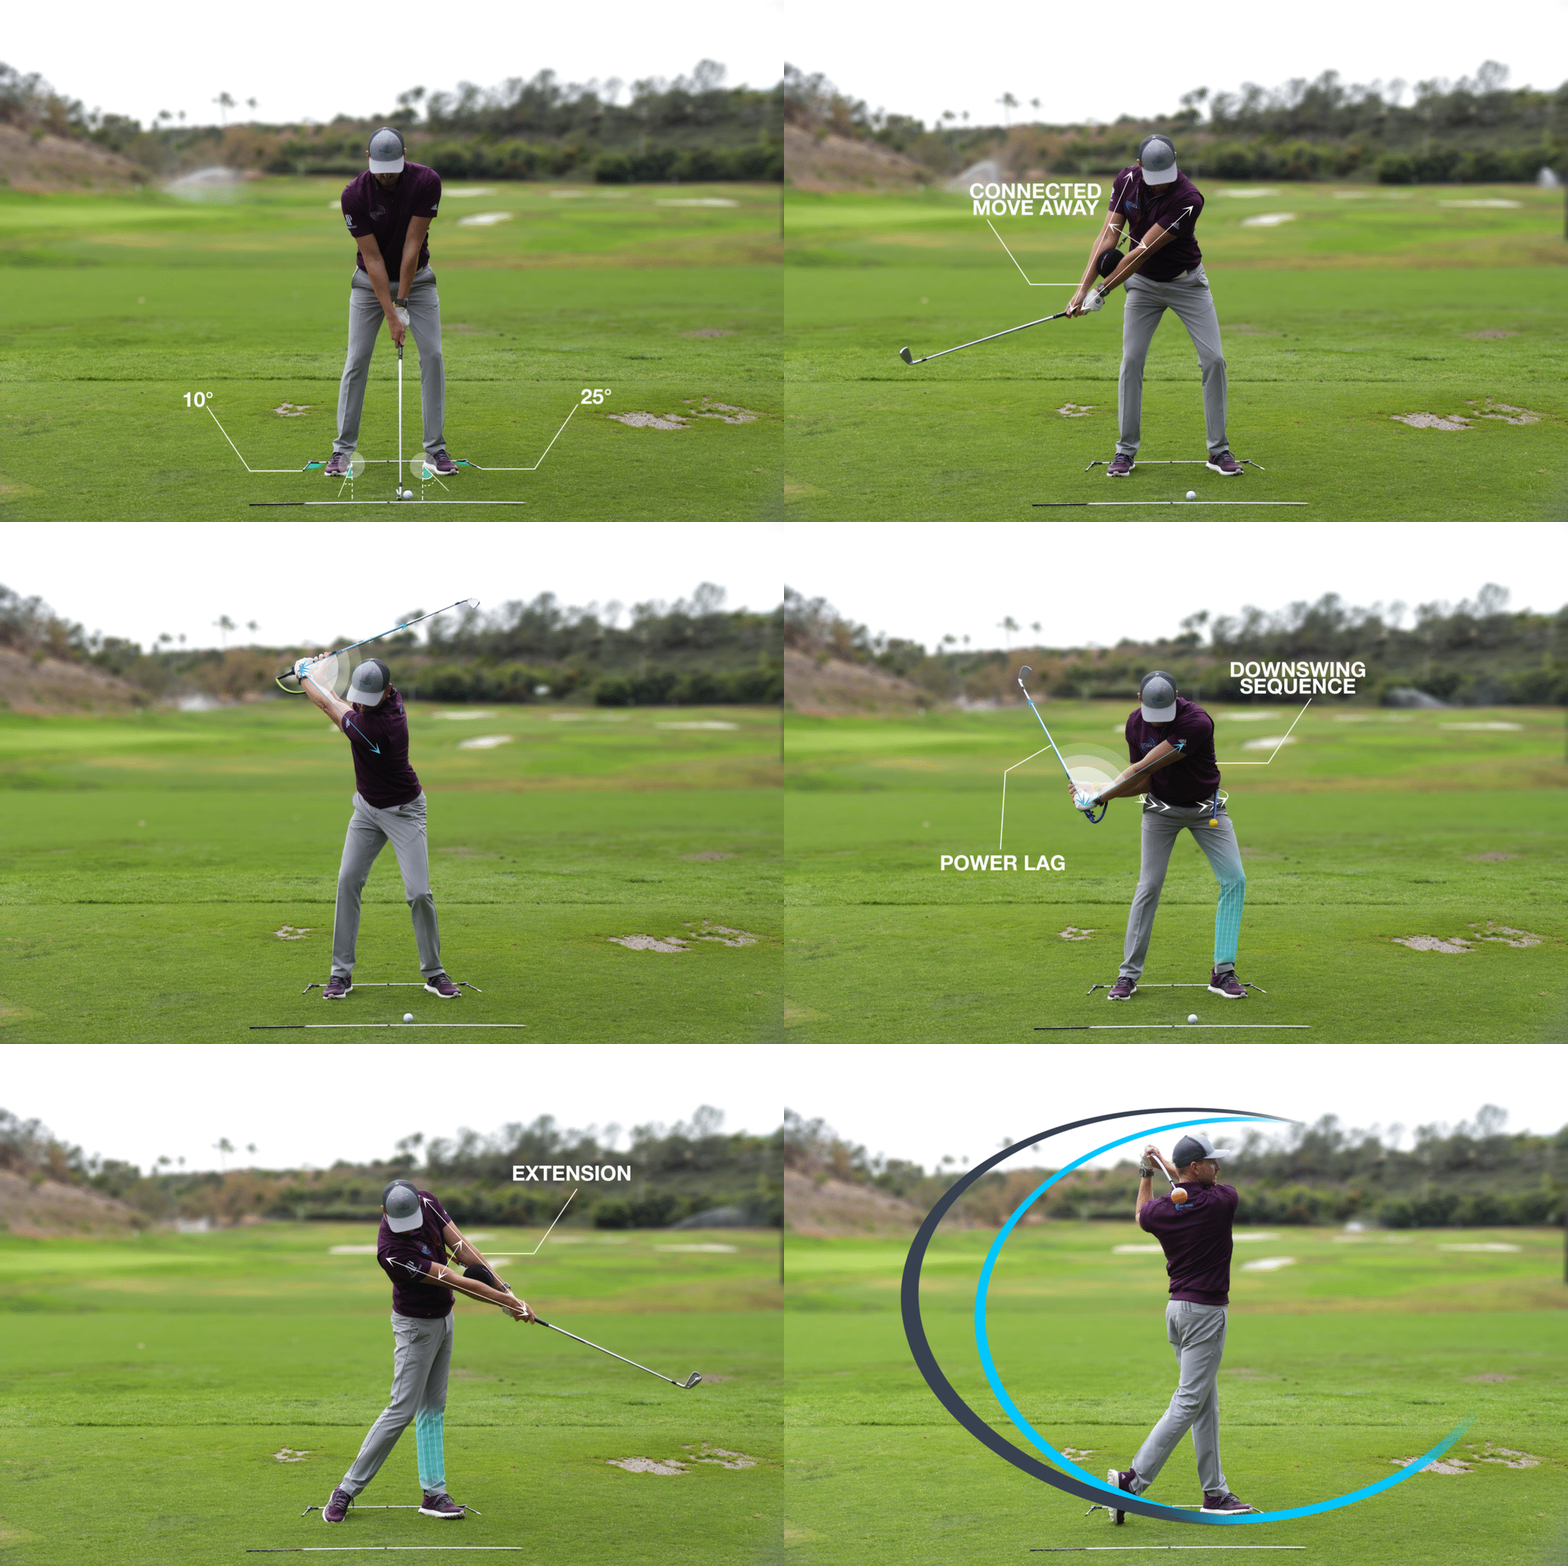
We know there is no such thing as the perfect golf swing. However, I want to share in this article as part of our Training Aids month at Me and My Golf, how and what training aids could help you with the different stages of your golf swing. Warning!! Just to be clear, we wouldn’t want you to work on all of these positions, with all of these training aids at the same time! Just one at a time please.
There are 2 very important things to remember when you’re working on different positions in your golf swing.
1. Only change a movement that needs changing! Just because it may be deemed “Technically” incorrect, or it looks different, doesn’t mean you automatically should think you need to change it. Changing actually might be the worst thing that you can do. The goal is to figure out what move is causing a problem, and then try working on improving or changing that area of your swing.
2. The key is to make the changes flow with the natural motion of your golf swing as soon as possible. If you’re only focused on trying to get your swing into a certain position, you could easily jeopardize the flow, and it doesn’t matter how good the positions are, it won’t work on the golf course. Yes its good to practice certain positions in the golf swing, but it’s always important to remember the flow.
So lets look at how these training aids can help your entire golf swing.
Set-Up
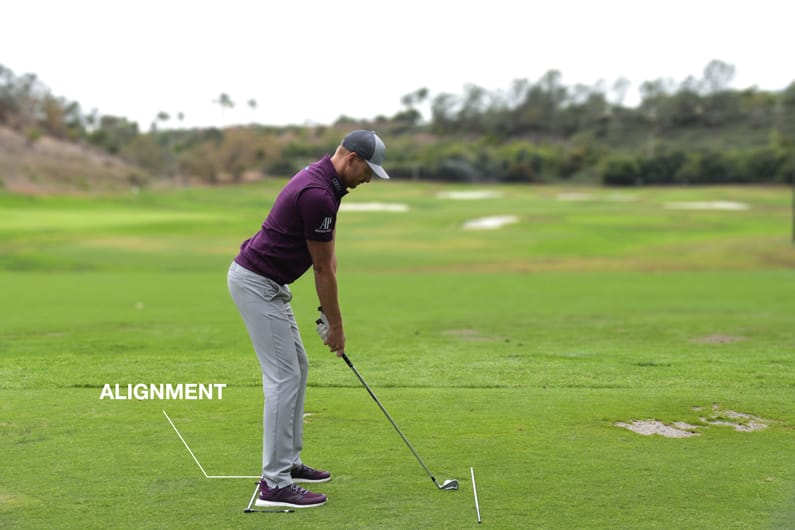
Creating good alignment and angles at set-up is obviously really important. With the Alignment Pro, you can use it for alignment of club face, as well as alignment of feet. If you can have a guide for the club face, it can be a really simple fix. Imagine if you’re hitting consistent bad shots to the right, only because you are consistently aiming to the right! It sounds very simple, but using the Alignment Pro could literally solve this and be the fix you need.
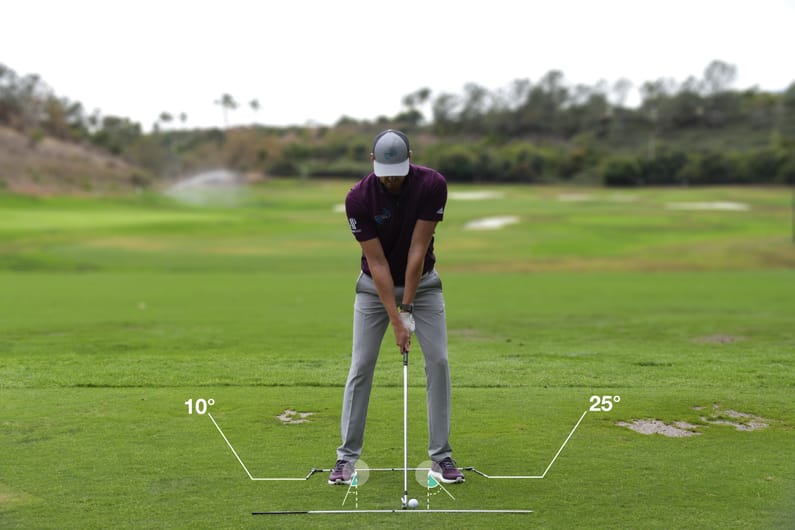
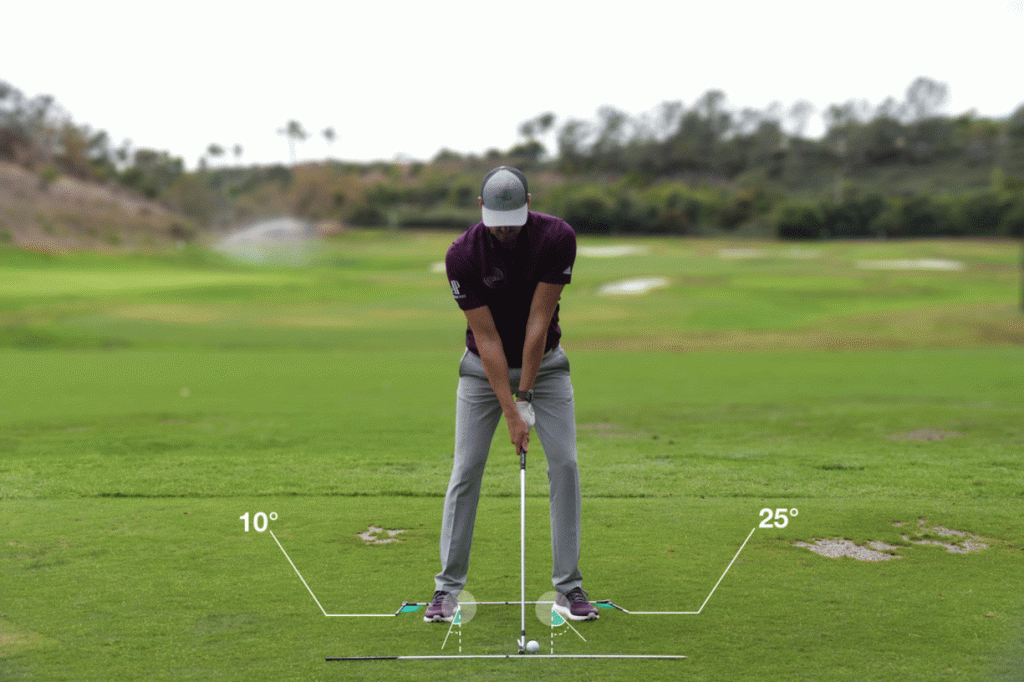
How you position your feet at set-up can have an influence on how you turn your body during the swing. By having your feet square at setup, you could be potentially limiting how much your hips can rotate. We like to have both feet flared out at least 10 degrees. In the image above, we have the feet set at 10 degrees for the trail foot, and 25 degrees for the lead foot. The reason the lead foot is flared more is simply because the left hip turns more through the downswing. We really like the Alignment Pro because it’s versatility it gives you with the hinges at either end. You can get the hinges set to any angle you want, and then just match your feet up to those angles. It’s great!
Your feet alignment can start to look distorted when you start flaring; this is why we put the alignment aid behind the heels. Oddly enough, the heels don’t change their alignment when you flare your feet, so the only way to get true alignment of your feet, is with your heels.
The Move Away
We talk a lot about producing a good sequence in the back swing, which is achieved when you are doing a good job of maintaining what we call, “a good structure.” Your obvious next question is…”what is a good structure Piers.” A good structure is the ability to move your arms around your body, without having them move in a direction that influences the body, club shaft or club face, in a negative way.
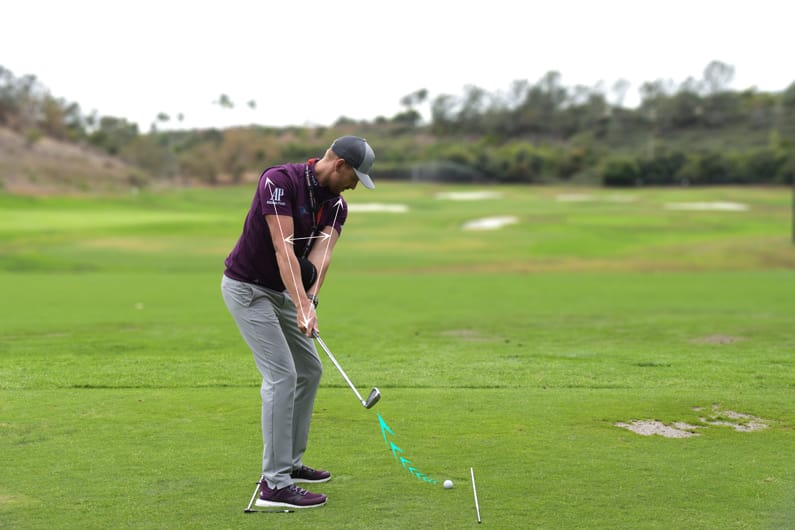
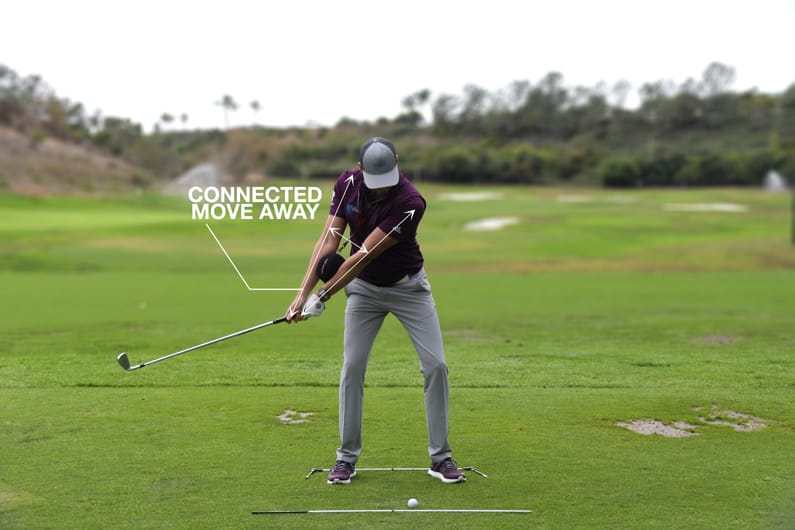
One way to achieve this is by using the Tour Striker Smart Ball positioned between the forearms. It allows you to create a good sequence, which in-turn creates good clubface control by not letting the clubface over rotate. It also puts the club on a really good plane.
Here’s a good tip when using the Tour Striker Smart Ball – Make sure that you don’t create too much tension in your arms by squeezing the ball too tight to keep it in place. This might take some practice, but a good rule of thumb is to treat it like it’s an egg.
Half Way Back
Continuing on to create a solid sequence in the back swing, we like to see a good amount of wrist set by the time the club reaches what we call, “the half way back position.” By completing the wrist set at this point (illustrated in the pictures below), you can literally complete your back swing with a simple rotation of the body.
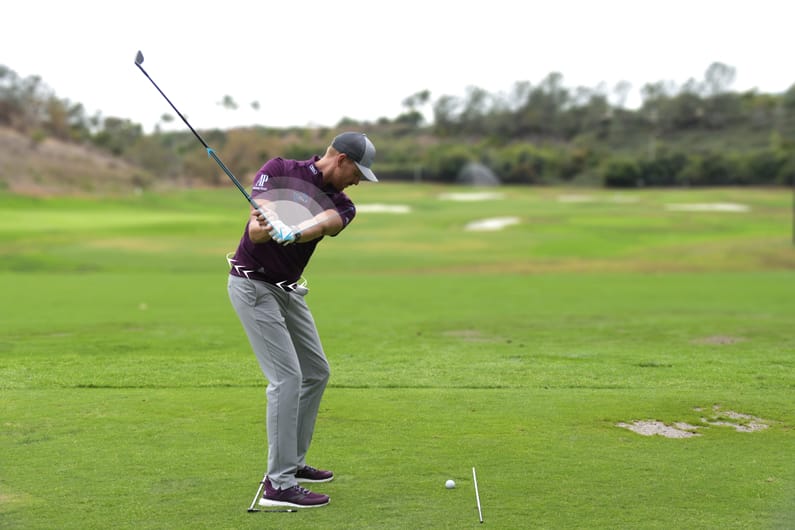
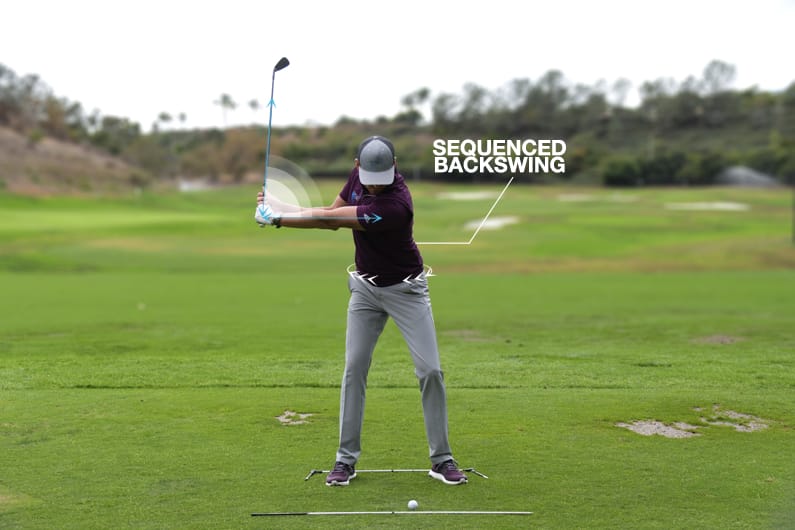
The Gabe Golf Swing Trainer is designed to help with the sequence of your back and down swing. There are ball bearings strategically positioned in the shaft that move up and down as you swing. At “the half way back” position, you want to hear the bearings fully drop into the handle. We encourage golfers to stop at this half way point to get the feel of how to achieve this. Once you get a good feel for this, you can start to move into the back swing without stopping.
Top of Back Swing
The back swing is, in a way, all about priming you for the best chance to execute a powerful consistent down swing. One of, if not the most important factors is the positioning of the wrists. If we can manage to control the wrists, then we have a better chance of controlling the plane of the swing, as well as the all-important club face. Ideally, you want to try and get your lead wrist flat at the top of the your back swing, as illustrated in the picture below. If the lead wrist has too much cup or angle in it, it can cause the club face to get too open. This can create all kinds of problems in the down swing.
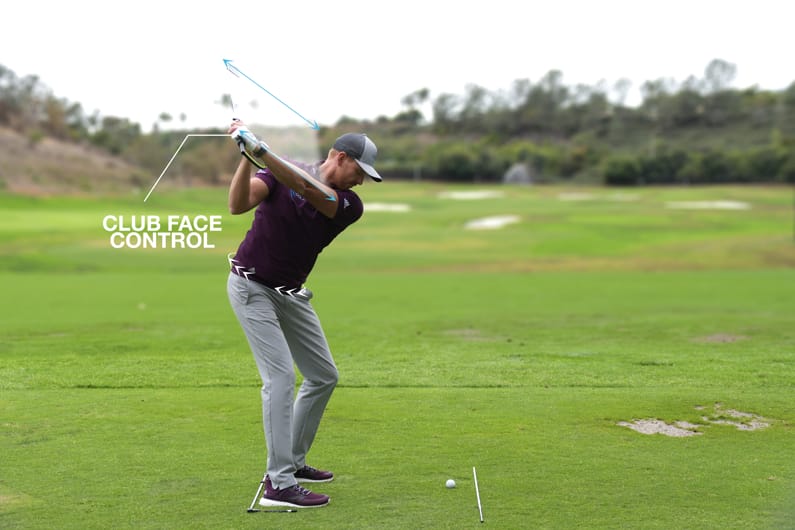
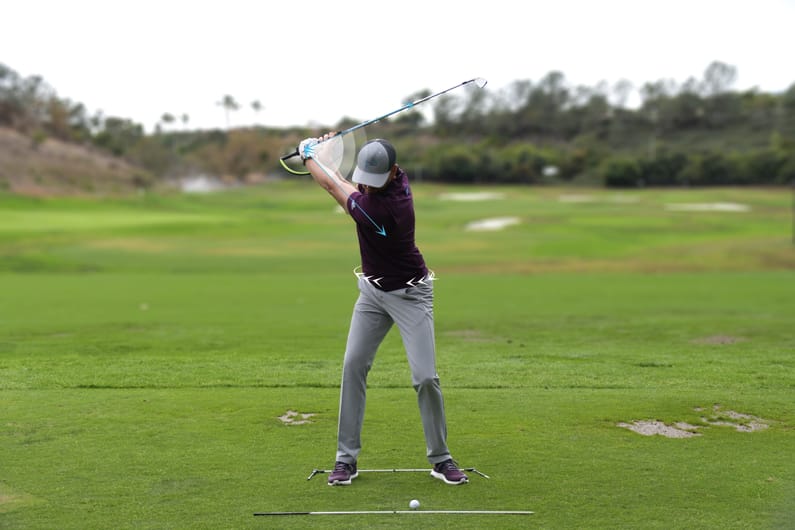
There are many training aids that you can use to help with the lead wrist positioning. In the above illustrations we are using the Watson Hanger. By keeping the Watson Hanger against the lead forearm, it ensures the lead wrist stays flat. It’s ok to feel a light pressure into the forearm with the hanger. This actually sends the wrist into what we call “flexion,” the opposite of cupping. This is an ingredient you want to have as you transition into the downswing.
Half Way Down
This is the most powerful position in the golf swing. The idea is to have your body moving and turning towards the target, all while maintaining the angles created by the wrists.
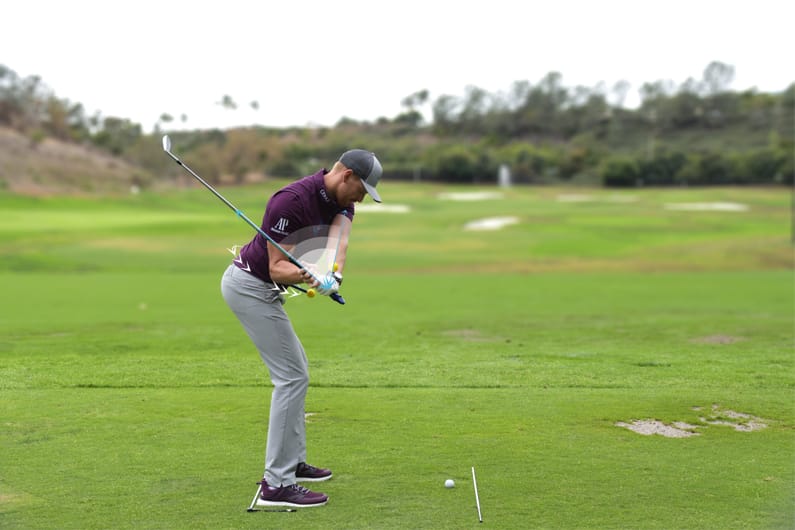
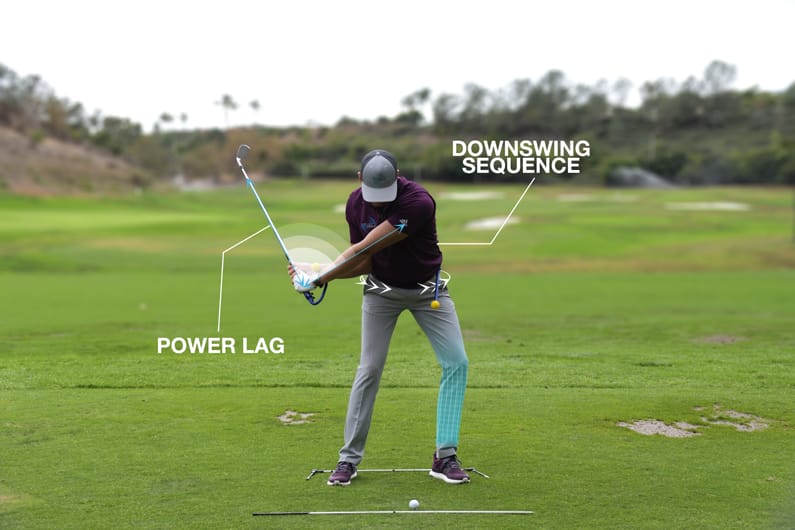
Here we are showing another great training aid that can help you make better rotation in the downswing. We basically want the lower body starting the downswing by moving and turning the BMT (Bio Movement Trainer) Hip rod from Total Golf Trainer. This gives you the awareness of how to get your left hip clearing out of the way by focusing on the yellow sponge ball. If you don’t clear and rotate your hips, your arms will swing into the sponge ball.
The Total Golf Trainer has multiple uses, but we have it attached to the lead wrist. By keeping the connection to the lead wrist for as long as you can, it enables you to maintain that “power lag” for longer, ultimately eliminating any Early Release.
Impact
When striking the ball, we want to get more pressure into the lead heel, rather than the trail heel – approximately 80%. There’s a couple things we really want to focus on – 1. Getting the body rotation we’ve spoken about, and 2. Getting the shaft leaning forward towards the target. By accomplishing these two, it allows the club head to travel downwards when striking the ball.
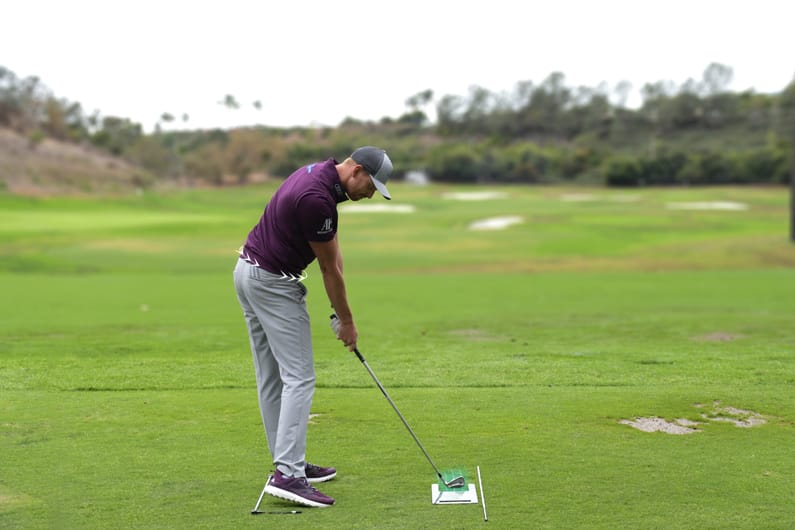
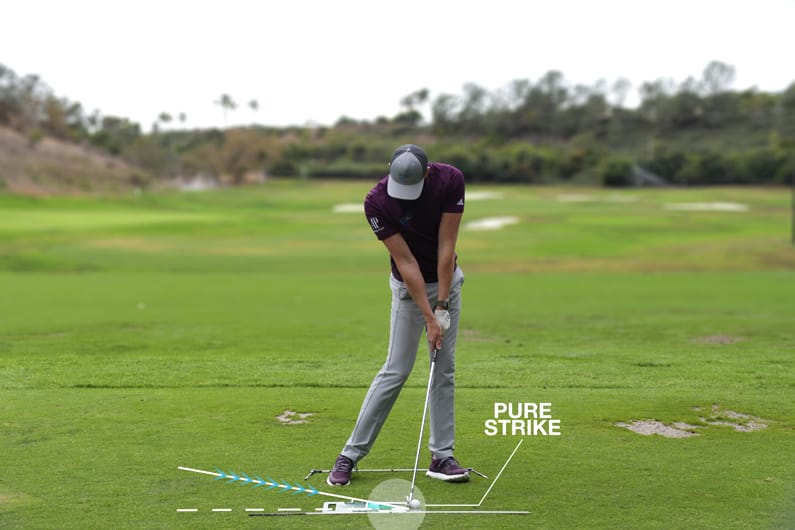
There’s a great little training aid that can help give the right feedback on where your club strike actually is. To help the club bottom out after the ball, we are using the Fat Plate. The Fat Plate has different versions that can be used – one for the driving range and one for on grass. It basically persuades you to improve your strike by giving instant feedback. If you hit the plate before the ball, then you obviously have bottomed out too early. You would think it would be easy to miss the plate, but it can be surprisingly difficult. We recommend utilizing this for the majority of the shots while you practice. It will really help you maintain forward shaft lean and produce a more downward strike through the hitting zone.
Through Impact
This is where the magic happens. As you can see, we’re continuing to move and rotate towards the target as we go through impact. Not only are we looking to move the body efficiently, but we’re also looking to maintain the arm structure with good extension. This maintains the plane and creates a consistent powerful rotation of the club face, as illustrated below in the two images.
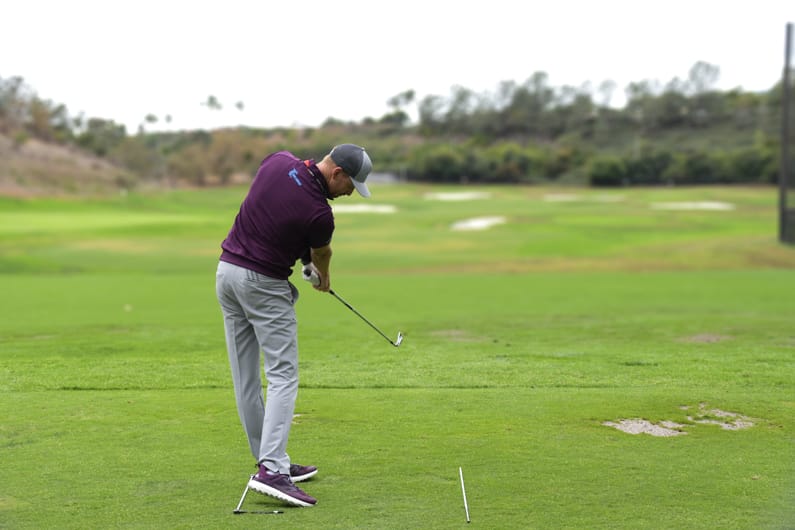
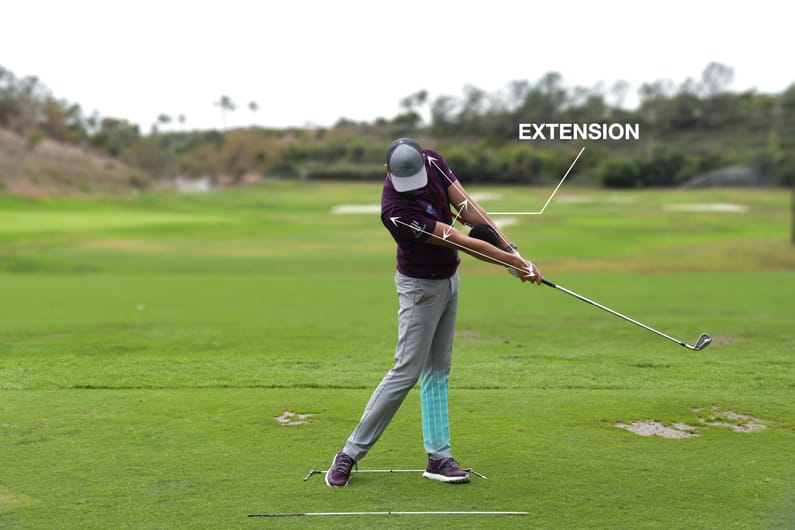
We have again used the Tour Striker Smart Ball to maintain the structure and extension. It works well to give feedback of any break-down in the arms that is generally is caused by the Chicken Wing swing fault.
The Finish And Blending It Together
Now for the finishing touches. We’ve stressed how important it is to make sure you keep the flow in your golf swing. This will really help you harness the consistency in each of the various positions we’ve spoken about during the golf swing.
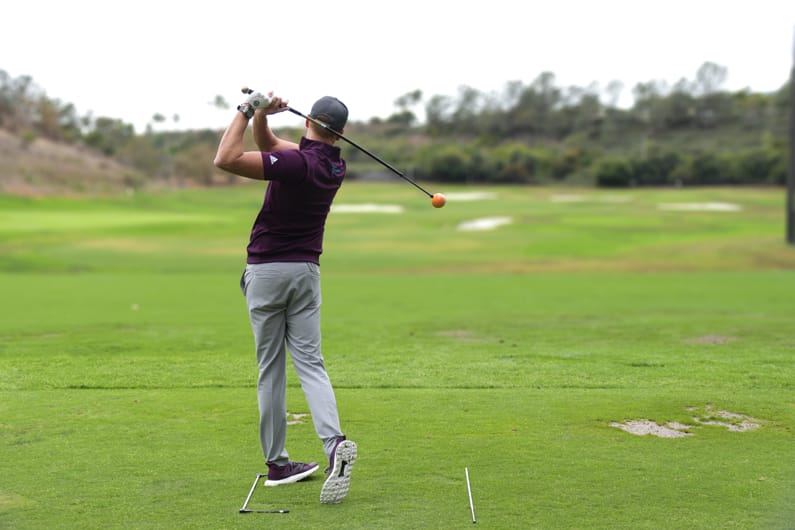
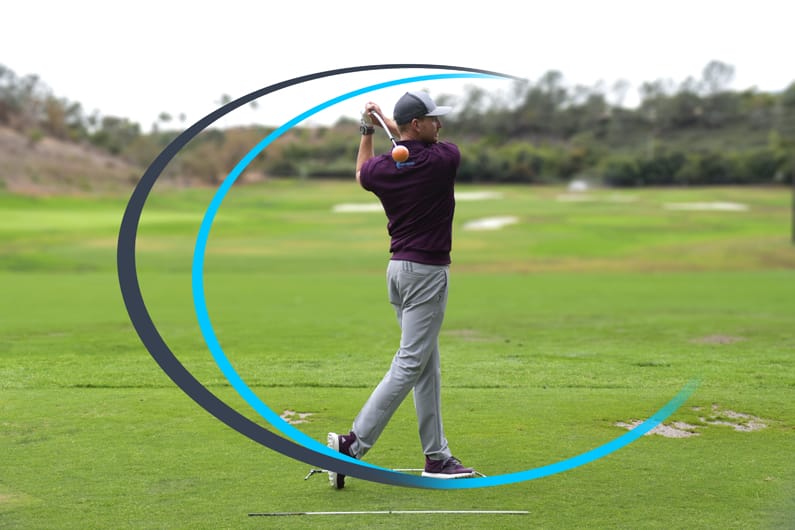
The Orange Whip is not only a great training aid for warming up, but the extra weight also helps you feel the various positions in the swing while maintaining the flow.
I hope that you’ve enjoyed this article. I recommend saving this article and continue to refer back to it often as you strive to produce a consistent golf swing. Please comment below any questions you have. We always try to respond.


Piers, this is terrific. I really appreciate the effort you and Andy put into making super clear and detailed articles with the layered on coloured guides, details (eg 10 degree back and 25 degree fro…
Piers, this is terrific. I really appreciate the effort you and Andy put into making super clear and detailed articles with the layered on coloured guides, details (eg 10 degree back and 25 degree front) and other visual cues. I’m sure it’s a ton of extra production work but it *really does help*.
I’ve been working with your videos the past couple of months and am making great progress … at least in my living room. 🙂 I’ve also been using the Orange Whip (midsize) and it too really does help me getting the right tempo (and a few minutes in the morning is a lovely way to stretch out my shoulders). If I were to say one thing that seems consistent throughout your coaching, it’s to look and be as athletic as possible (stance, swing arc, etc). The more I do that the more your instruction works for me. So thanks for that!
Tom
Just noticed that you snap your left leg straight just before impact. A bent left leg puts the left hip at a certain height. A straight left leg raises the left hip. Since the left side is straight at…
Just noticed that you snap your left leg straight just before impact. A bent left leg puts the left hip at a certain height. A straight left leg raises the left hip. Since the left side is straight at impact raising the left hip will raise the left shoulder. With the left arm straight, raising the left shoulder will, through the straight arm, raise the sole of the club.
All this means that your swing has a critical few split seconds before impact that can cause a thin, thick or perfect contact dependng on the instant you choose to snap the left knee from bent to straight.
In addition this repeated action can damage your knee (ask Mr. Woods about this knee damage).
I’ve also noted that a number of top golfers (especially the ladies) almost end up at impact with just their toes touching the ground – yet another club sole height late modification.
I would have thought that those instant changes would bring some degree of degradation of reliability or repeatability in the swing. Is it not vital that the platform for the swing remain at the same height throughout the swing – especially for golfers without the time or inclination to spend hours and hours repeating a swing?
Cheers
Ian
So now I’ve gone through all the “Swing fault – slide” videos on the site and yes, at the end of the shot the left knee is straight. But just when should the knee straighten – before, at, or after imp…
So now I’ve gone through all the “Swing fault – slide” videos on the site and yes, at the end of the shot the left knee is straight. But just when should the knee straighten – before, at, or after impact. Clearly a straight lead leg helps avoid the slide fault, but a straightening lead leg also changes the platform height.
The illustrations shown in the article appear to indicate the left knee instant snap straight at impact. Even the blue shading of the lead leg below the knee in the first illustration seems to demonstrate even further the knee snap at impact. This not the case with the earlier “slide prevention” videos. Earlier videos appear to show less of a snap and more of a rapid straightening starting just before impact and completing immediately after impact.
The position of Piers’ left toes show the difference. In this article the snap throws the weight on to the hell and the toes end up in the air pointing down the shot line. In the slide prevention videos the left toes stay on the ground with the foot in the same position as at address (albeit with the weight on the outside edge).
I argued above that the instant knee snap could lead to contact irregularities for the less skilled or less practised golfer. But, I can see that the straight lead leg is essential to avoid the slide.
Do you guys have any thoughts about the differences between Piers’ swing in this article and Piers’ swing in the “slide prevention videos” particularly with the very different left knee and foot positions.
Cheers
Ian
Hi Ian.
Thanks for the comment! Great point about the left knee. We wouldn’t recommend that you “snap” the knee back as what we want is the left leg to straighten as you rotate through impact. You c…
Hi Ian.
Thanks for the comment! Great point about the left knee. We wouldn’t recommend that you “snap” the knee back as what we want is the left leg to straighten as you rotate through impact. You can do this also without losing your height. Also, don’t think of it as it needs to be in a certain place at impact. We just want to make sure that it’s not excessively moving towards the target and causing any issues. Some golfers will straighten it at impact and some will do it slightly after. As long as the ball is doing what you want then that’s fine. It is all about “feeding what you need” i.e. more rotation and straightening or more lateral. Hope that makes sense Ian?
Thanks
Andy
Just one last point. If anyone has any doubts about the height change effect of the llead knee snap, just check out stop motion effect of the Piers’ left should just before and at impact in the first …
Just one last point. If anyone has any doubts about the height change effect of the llead knee snap, just check out stop motion effect of the Piers’ left should just before and at impact in the first illustration in the article.
Check the left shoulder with regard to the line of bushes in the distance behind Piers.
Looking forward to some clarification.
Cheers
Ian
So, it’s taken a while for me to understand what’s happening in the first illustration of the article. Check out the watering system jets behind Piers. You can see that each pause position shows a a s…
So, it’s taken a while for me to understand what’s happening in the first illustration of the article. Check out the watering system jets behind Piers. You can see that each pause position shows a a significant change in the water jets directions. I guess that means that the first illustration is not a continuous swing. It looks as if it could be a series of posed positions.
If this theory is correct then it should not be a surprise that some posed positions are not exactly the same as they would be in a continuous swing where individual frames of a video have been isolated. Perhaps that’s why the first illustration with the snapped left knee, rock solid left leg at impact, and the left foot pointing down the target line at the end of the follow through. Note also the sudden appearance of the orange ball at the end of the swing instead of the iron club head at the start of the swing in the first illustration.
I hope this explication helps everyone, in the absence of response from Piers or Andy, to avoid the left snap and straight solid left leg at impact.
Cheers
Ian
Hi,
Great article.
Actually filled a some gaps I was wondering about after watching a lot of your videos.
I was missing something like this explaining fundamentals.
Hi Timmy. That’s great! Happy to hear this cleared a few things up for you.
Thanks
Andy
Hi,
Great video! I stopped playing golf about 5 years ago after a car accident and back surgery (L4-S1 fusion). Do you have any videos or suggestions for building a shorter, more efficient golf s…
Hi,
Great video! I stopped playing golf about 5 years ago after a car accident and back surgery (L4-S1 fusion). Do you have any videos or suggestions for building a shorter, more efficient golf swing for someone like me? For a good 15 years I was about a 10 handicap and I am physically ready to get back into the game by building a new swing based on fundamentals.
Thanks,
Tim
one thing I’ve been struggling with, is the wrist hinge. I understand that you like to see a good amount of wrist set halfway back on the backswing. But at the same time the top of the backswing you l…
one thing I’ve been struggling with, is the wrist hinge. I understand that you like to see a good amount of wrist set halfway back on the backswing. But at the same time the top of the backswing you like a flat wrist. I think what I’m wondering is whats the difference between wrist hinge and set, because if I am to hinge my wrists halfway back then there will be a more of a cup at the top. I think I’m just hinging my wrists wrong. Thanks
Great question! Wrist set and hinge are the same. However you can set the wrist in a poor position. If you are cupping the wrists too much then you can create an “open” club face and too much set. Wri…
Great question! Wrist set and hinge are the same. However you can set the wrist in a poor position. If you are cupping the wrists too much then you can create an “open” club face and too much set. Wrist hinge is basically a vertical movement of the wrists. If you add in a cup then you increase the set but compromise the club face. It is just a balancing act getting the lead wrist more neutral. From out experience steer away from creating too much cup and keep the lead wrist more flat. Please let us know how you get on.
Thanks
Andy
I’m a fresh amateur but thanks to your well explained and enthusiastic training people are starting to say I have a “natural talent”. I know that’s not true, its just hours of watching your videos and…
I’m a fresh amateur but thanks to your well explained and enthusiastic training people are starting to say I have a “natural talent”. I know that’s not true, its just hours of watching your videos and being conscious of what you teach in the field.
So thanks and keep on the good work.
Great article – if you have a lack of flexibility in your back would you recommend forcing your way through (to or near to parallel) whilst working on your flexibility or using a three quarter back sw…
Great article – if you have a lack of flexibility in your back would you recommend forcing your way through (to or near to parallel) whilst working on your flexibility or using a three quarter back swing? Thanks.